How To Plan And Manage An RV Plumbing Renovation Project
It’s easy to overlook the importance of a plumbing system in your RV. However, a good plumbing system makes your RV homely, with hot showers, a functional toilet, potable water in the sink, and much more.
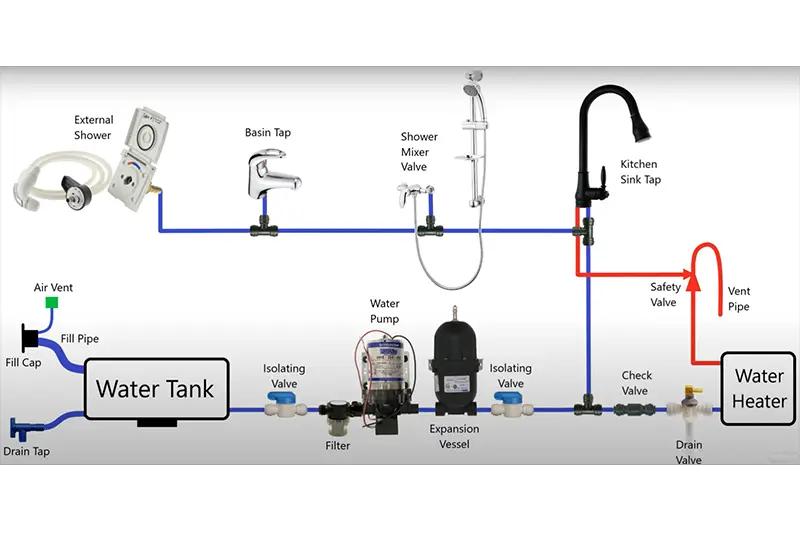
Upgrading your RV plumbing system is, therefore, an important and a meaty topic. Unfortunately, there isn’t much comprehensive information about RV plumbing systems, at least not in the details many RVers usually look for.
The good news is you shouldn’t beat yourself about it because, in this guide, I outline the crucial RV plumbing updates for anyone needing to do it all from scratch.
Update your Current Plumbing System
Most RVs in the market utilize flexible plastic tubing (polybutylene), which is quite old-fashioned. My understanding is most RVs post-2000 have PB plumbing systems.
The problem with the PB system is that it has a fairly short useful life, and the worst part of it is that it starts breaking down from the inside and may actually deceive you.
I suggest replacing the PB system with Polyethylene (PEX). There’s always some kind of print on the plumbing line you can read to tell the difference.
[amazon box=”B08J61BXWF”]
A great advantage of PEX is that it’s flexible and has a higher water pressure capacity.
It’s also fairly freeze-proof and perfect to use in chilly winter conditions. When the water inside the PEX piping freezes, PEX swells and hardly splits.
A PEX plumbing system is also lighter, cheaper than copper, and not as rigid. In short, it’s easy to work with.
However, while PEX remains an easy-to-manage plumbing system, it’s crucial to fit it correctly. Fixing the PEX plumbing system correctly involves using the correct fittings and crimps. It also involves using the correct crimping tool. Lowes or Home Depot has plenty of PEX tubing, fitting, and crimpers.
The only issue with PEX is that it’s generally harder to pitch, so it’s drainable during winterization.
Add An Extra Sewer Tank Valve
[amazon box=”B002N5L9T6″]
Dumping the holding tanks and sewage is usually unpleasant in most cases. Sometimes, the slide in the dump valve malfunctions, leading the undesirable contents to spill away into your hands and on the ground.
However, by adding an extra sewer tank valve, it’s easy to make the unpleasant job of dumping sewage. It eliminates the need to catch the runaway sewage with your sewer slinky.
The additional valve blocks the runaway contents until everything is successfully hooked in.
Add A Built-In Water Filter
[amazon box=”B07SX5RPG6″]
If you’ve been RVing in different places, you know water quality isn’t the same across the country, which is why you need a water filter.
Of course, you could buy bottled water, but that doesn’t work for me, and exactly what I look forward to avoiding with a water filter.
I also love going into the boondocks indefinitely, like 6+ months at a time, and I always feel it’s critical to produce my drinking water.
My goal is essentially to be able to filter anything or as close to that as reasonably possible. For example, I’d like to be able to pump river water into my RV’s fresh water tank in remote locations and be confident that I’ll have safe water to drink.
To get the best possible drinking water, I’d suggest you create a simple 4-stage water filtration. Also, consider carbon and water softener filters for the best results. It’ll save time and provide the best quality water for your RV.
In the same breath, it may also be a good idea to focus on two stages of water storage. One in-line when filling my fresh water tank for drinking and cooking, and another line for washing hands, dishes, and bathing.
It eliminates the need to filter so much to a pure degree, which will sit stagnant in the tank.
You might also have realized that the water and the sewer hookups in RV parks are usually in close proximity in most cases. There’s a logic behind this, and my guess is to promote convenience.
The problem with this arrangement is that it’s easy to contaminate the water spigot with wayward waste. Therefore, I suggest that before you connect your water hose to the spigot, you spray the spigot with rubbing alcohol, bleach, and water or any alternative solution for sterilization purposes.
Update your Pressure Regulator
Sometimes, water pressure in RV parks can be high enough to burst the pipes and fittings in an RV system.
Normally, most RV plumbing systems can accommodate a maximum of 50 PSI, but it’s not uncommon for RV parks to have 60 to 80 PSI.
A pressure regulator can, however, circumvent this issue. Of course, many pressure regulators, especially the cheap models and those coming as “starter kits,” create another issue: low water pressure. The flimsy regular cut the water flow by reducing the pressure.
My suggestion is you go for the small residential adjustable pressure regulators. Most are functional, and the best part is you can pre-adjust them to 50 PSI and tweak them as desired.
It’s not to mention that for a part like a simple regulator that costs less than 30 bucks to buy and protects your investment, it’s crazy not to.
[amazon box=”B083HSQMHX”]
*Tip: If you’ll be away from your RV for some time, it’s important to detach it from the RV park water hookup or at least turn the water off at the spigot. Intense heat or defective material may result in a pipe or hose burst.
Increase your RV Water Storage Tanks
The thing I used to like least with my previous RV was the small freshwater tank. It was only 45 gallons and inadequate for my family’s needs.
[amazon box=”B079T72D1X”]
And no, we’re a conservative family and used all the tricks in the book to extend our freshwater tank longevity. Unfortunately, we would still run out of water before our trip.
But that was until I learned about an easy way to get more fresh water into my tank when camping.
Modifying your RV’s fresh water tank and adding a second tank is a great way to increase your RV storage capacity.
Depending on the project’s complexity, you could make it operate like one big freshwater tank or multiple tanks.
Of course, you must consider the weight and size limitations before adding a new tank to your RV.
But most importantly, you must practice water conservation while camping.


